


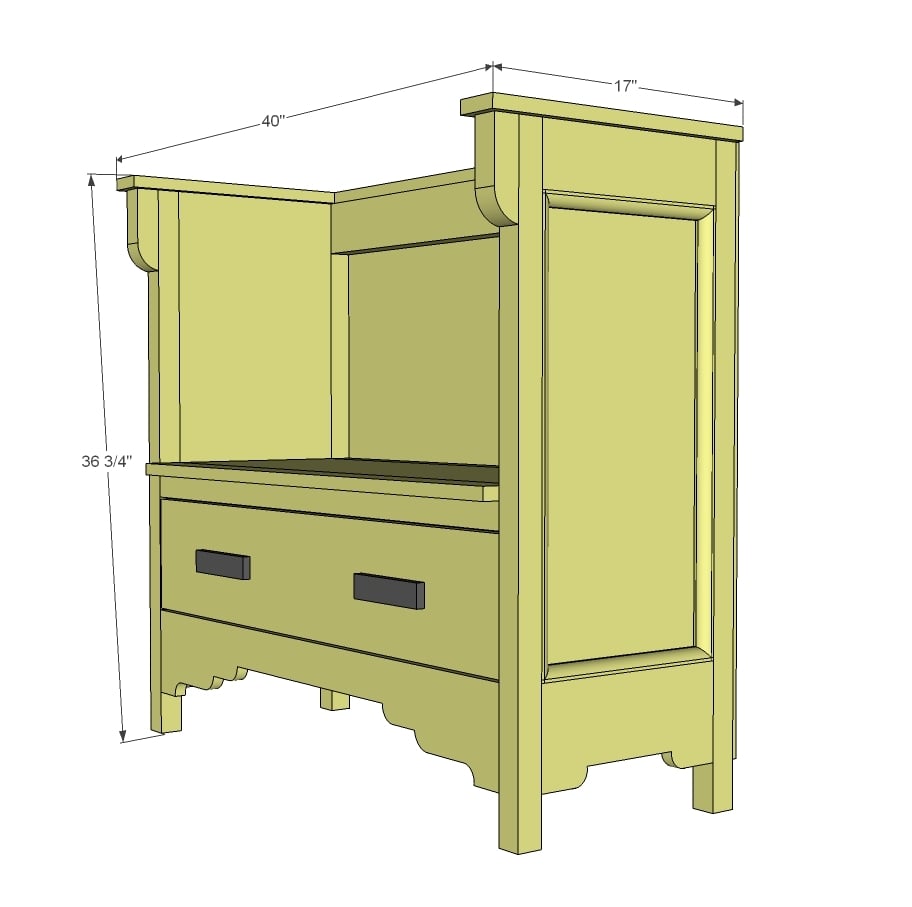
Build a vintage style bench. Free plans from Ana-White.com

A few months back Ashley from Shanty 2 Chic and I talked about putting plans together for an entry bench with a back and arms. You know - the ones that resemble antique pew benches?
Well after going back and forth on bench designs, we kinda dropped it because the plans were just too complicated. I'm all about simplicity.
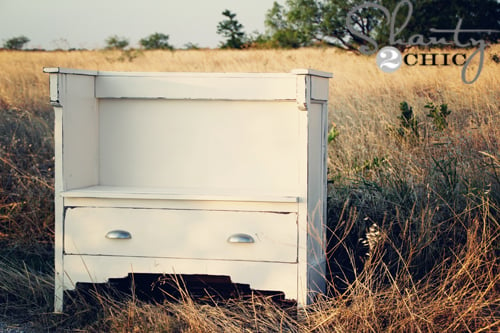
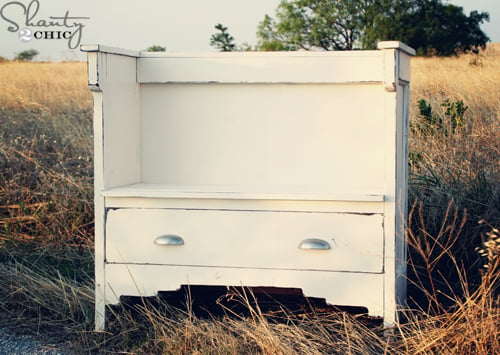
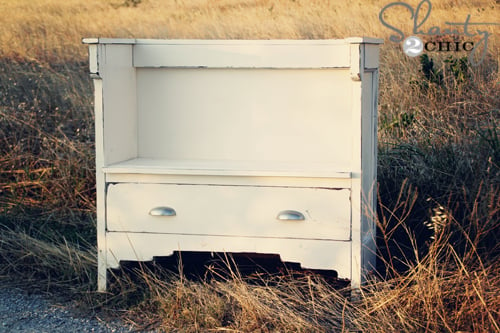
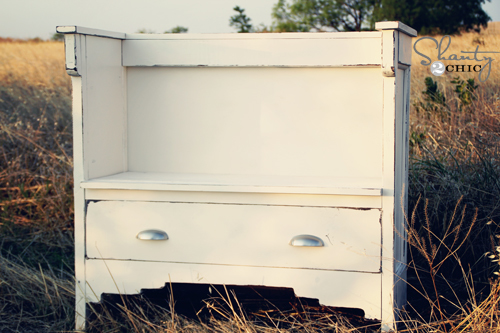
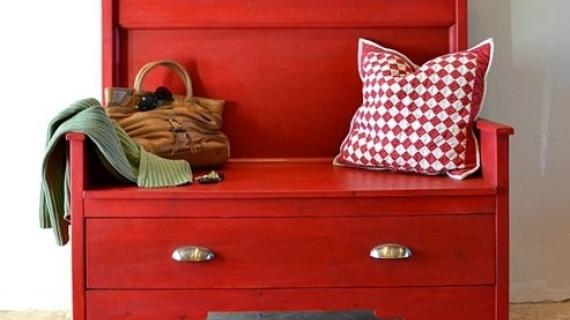
But then when I pinned this bench, and 167 of you repinned it (hey, thanks!) I knew we had to make some plans up for you. So I asked Ashley what she thought of the bench.
Ashley LOVED the bench!!!

I was a little concerned about the plans being more complicated than I am comfortable with and I kept telling Ashley, I know this is going to be a pain to build with a drawer and all those jigsaw cuts .... details, details ... they'll kill ya!

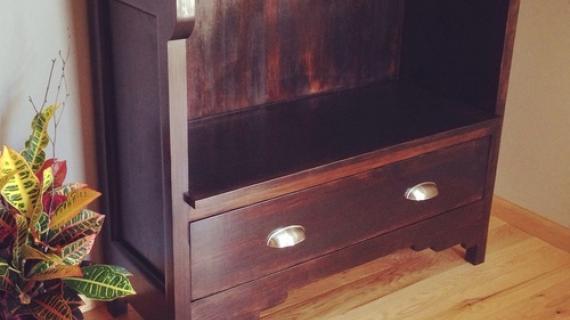
But Ashley totally NAILED the bench! hehe!!!
Here's from Ashley:
I will be honest and say that I was TERRIFIED to build this. I am not experienced with my router and the idea that I would have to cut the detailing on that bottom board ~ which is what makes this bench so unique and vintage looking ~ was almost enough to turn me off completely! Well, I loved it so much that I decided to give it a go and it was NOT hard at all! Thank you Ana:)
And of course, we got you covered with the plans right here!
Preparation
1 – 1x12 @ 10 feet long
1 – 1x4 @ 2 feet long
1 - 1x2 @ 8 feet long
2 – 1x6 @ 8 feet long (could get away with 1 at 6 feet long)
3 – 2x2 @ 8 feet long
1 – 1x3 @ 4 feet long
1 – 2x4 @ 8 feet or stud length
1 – 1x8 @ 3 feet long
1 – ¼” plywood – will need full sheet
1 – 8 foot sticks quarter round
1 ¼” and 2 ½” PH screws
1 ¼” and 2” finish nails
Wood glue
Drawer hardware
2 – 1x12 @ 32 ¼”
2 – 1x4 @ 11 ¼”
2 – 1x6 @ 11 ¼”
4 – 2x2 @ 36”
2 – 2x2 @ 5 ¼”
2 – 1x3 @ 16 ¼”
1 – 1x2 @ 35” (back top)
2 – 2x4 @ 36” (back supports)
2 – 2x2 @ 36” (back bottom and front support)
1 – 1x6 @ 36” (front apron)
2 – 1x2 @ 12” (wood drawer slides)
1 – 1x2 @ 36”
1 – 1x12 @ 36”
1 – 1x3 @ 36”
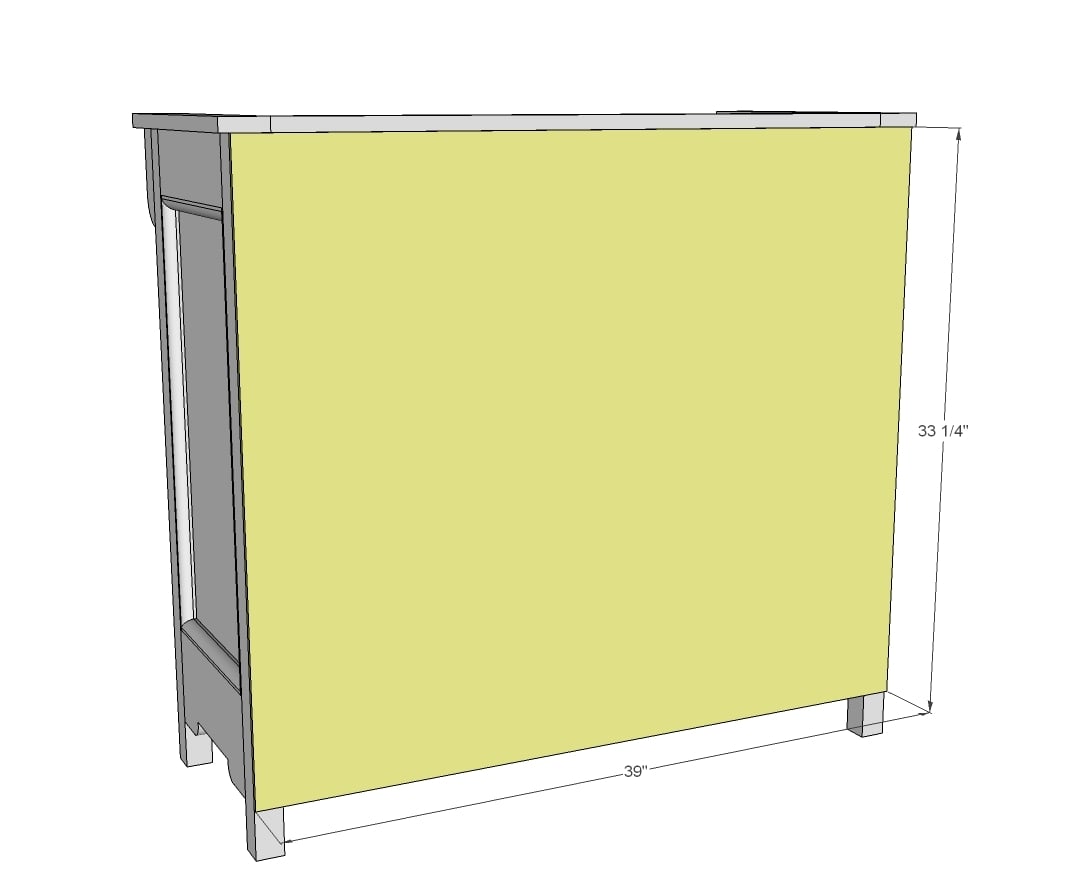
¼” plywood @ 33 ¼” x 39”
DRAWER – no guides, fits snug. Test fit.
2 – 1x6 @ 11 ½”
2 – 1x6 @ 34 1/4”
1 – ¼” plywood @ 35 3/4” x 11 1/2”
1 – 1x8 @ 35 ¾”


Please read through the entire plan and all comments before beginning this project. It is also advisable to review the Getting Started Section. Take all necessary precautions to build safely and smartly. Work on a clean level surface, free of imperfections or debris. Always use straight boards. Check for square after each step. Always predrill holes before attaching with screws. Use glue with finish nails for a stronger hold. Wipe excess glue off bare wood for stained projects, as dried glue will not take stain. Be safe, have fun, and ask for help if you need it. Good luck!
Instructions
Step 1
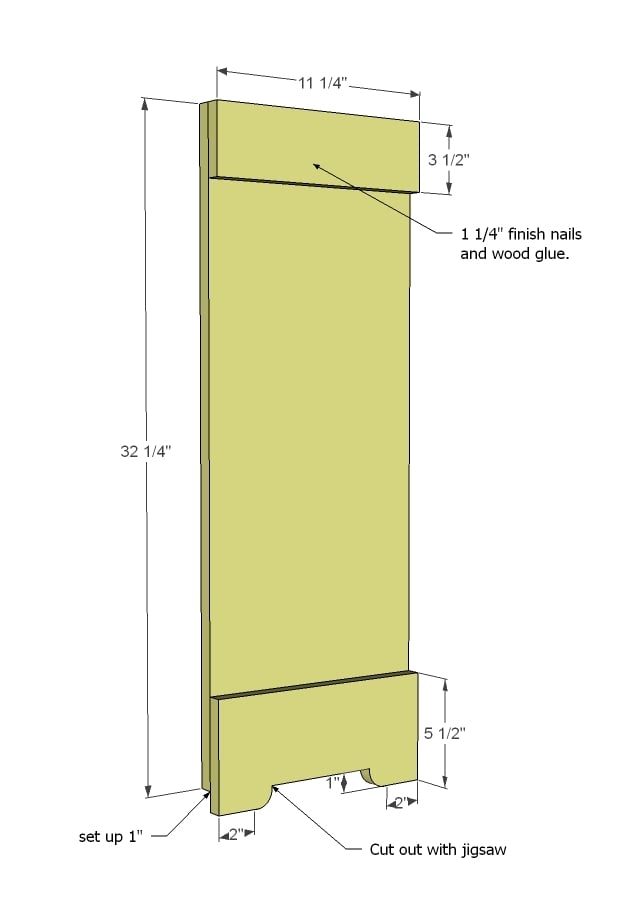
First build the two ends. You'll want to drill 3/4" PHs on both sides of the inside panels so you can attach the legs in the next step.
Step 2
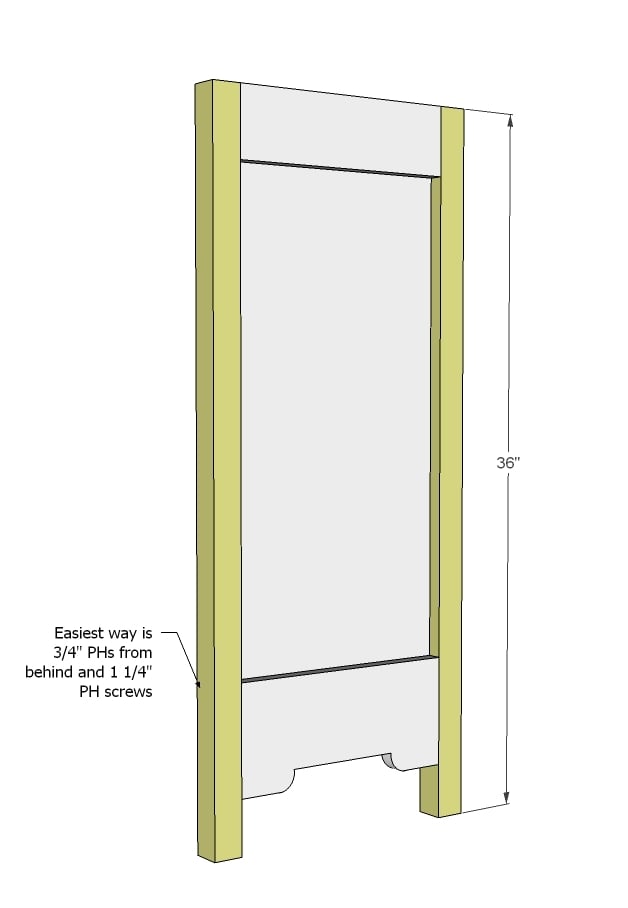
Then attach the 2x2 legs with 1 1/4" PHs through the holes you drilled in step 1. Remember, you are making two leg sets.
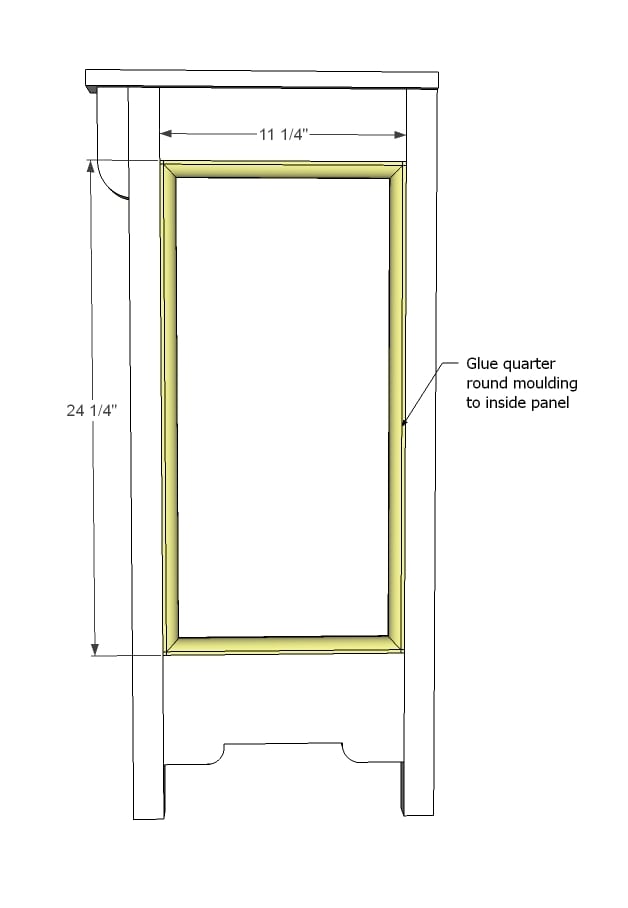
Step 3
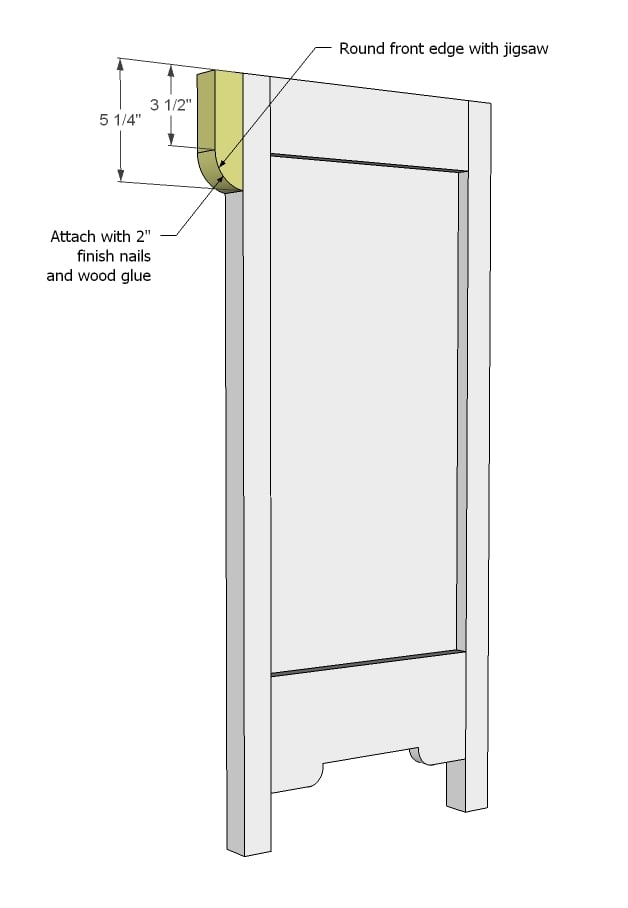
Now add the front decorative piece. Remember that you need to make two ends in mirror.
Step 4
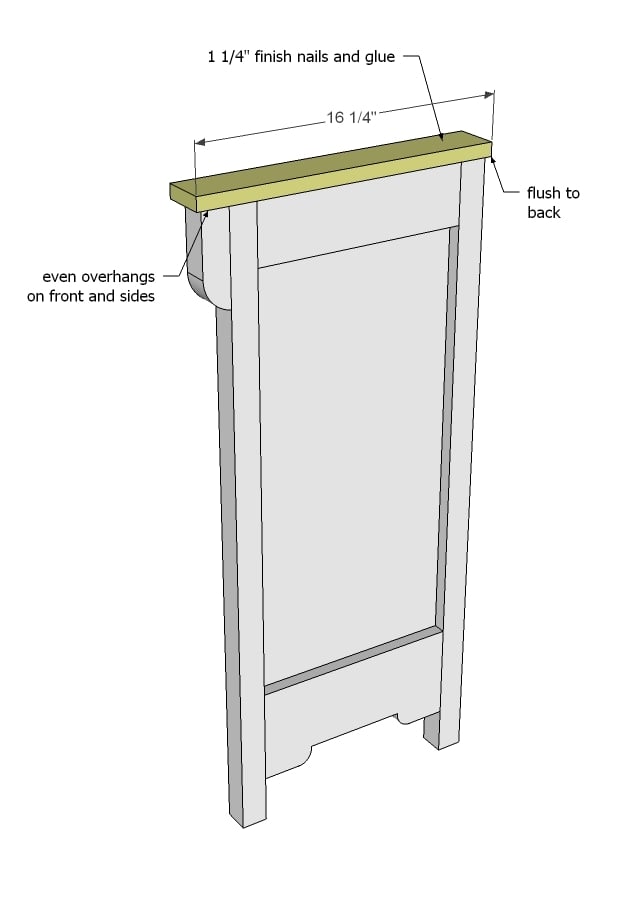
And then the top. Don't forget - the two ends are made in mirror.
Step 5
Step 6
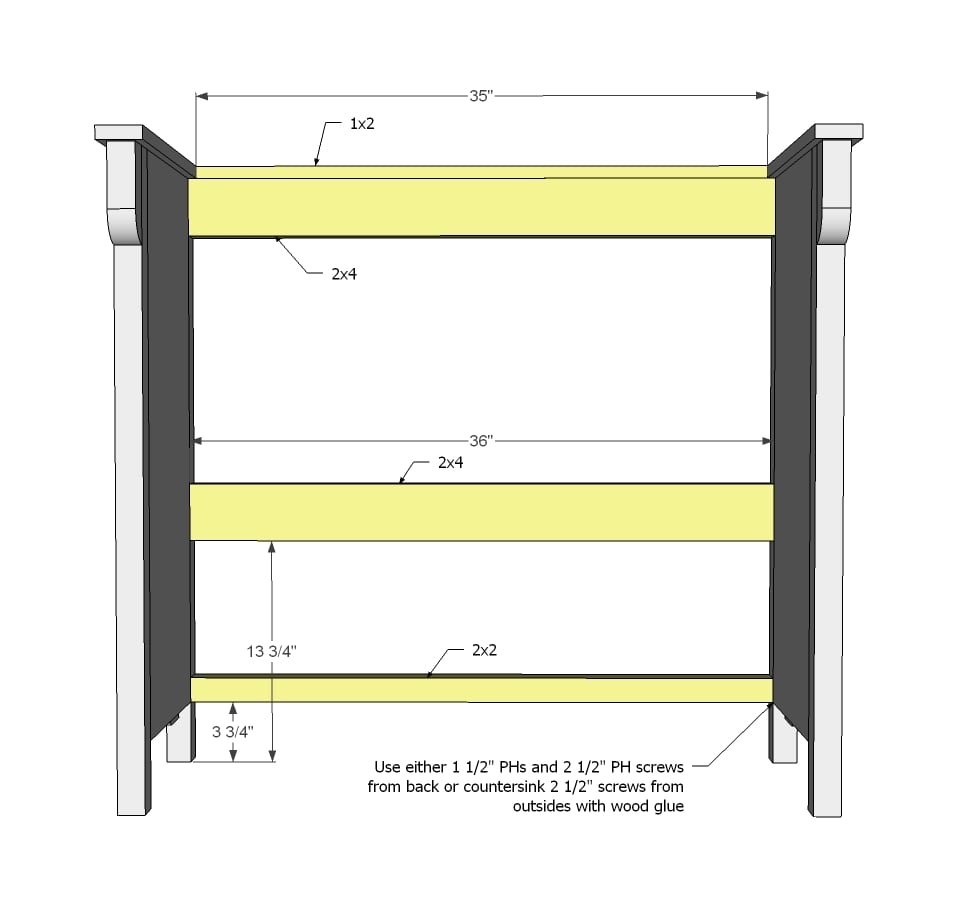
Now we are going to join the two ends together to start making the bench. I suggest PHs from the back side.
Step 7
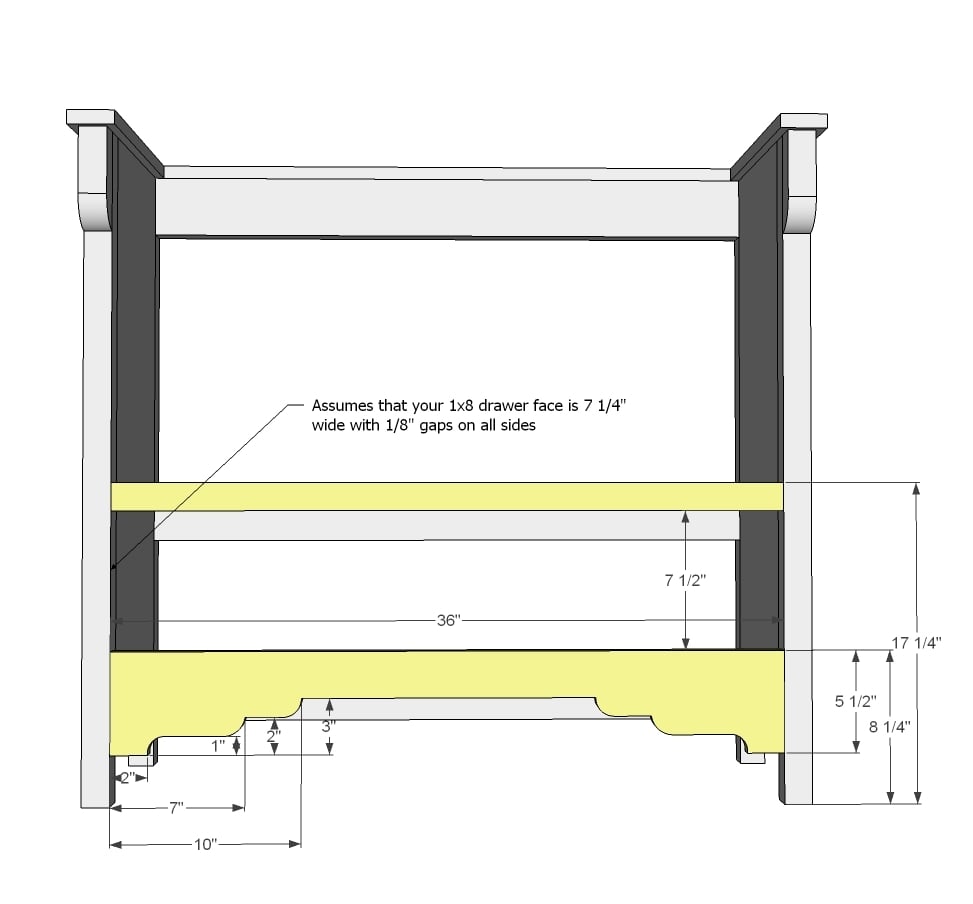
And then the front.
Step 8
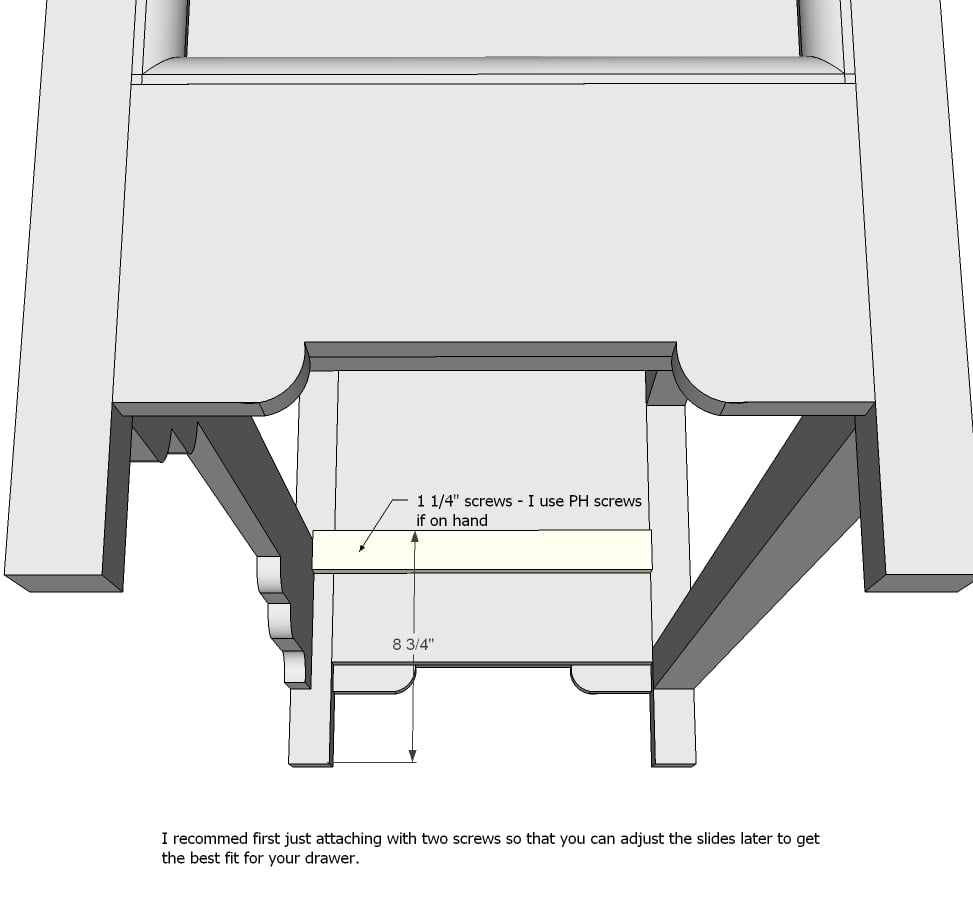
Now the drawer slides.
Step 9
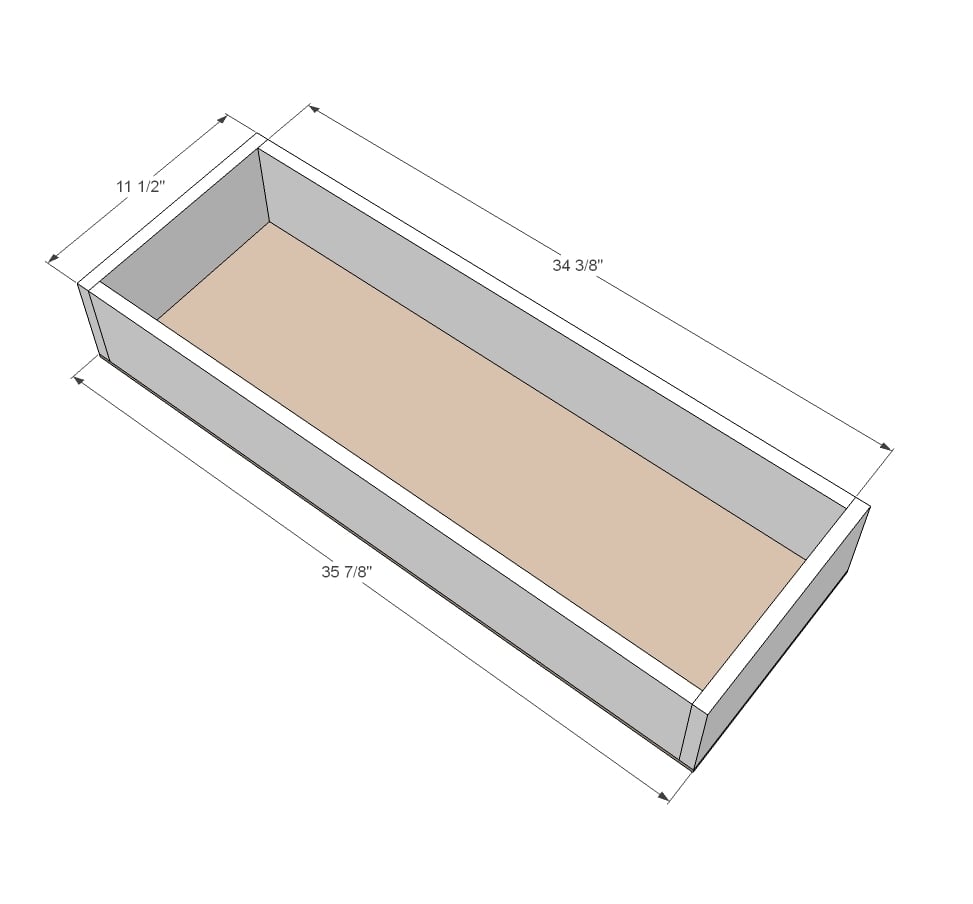
Now build the drawer to fit your opening. I gave a little space for the drawer to slide.
Step 10
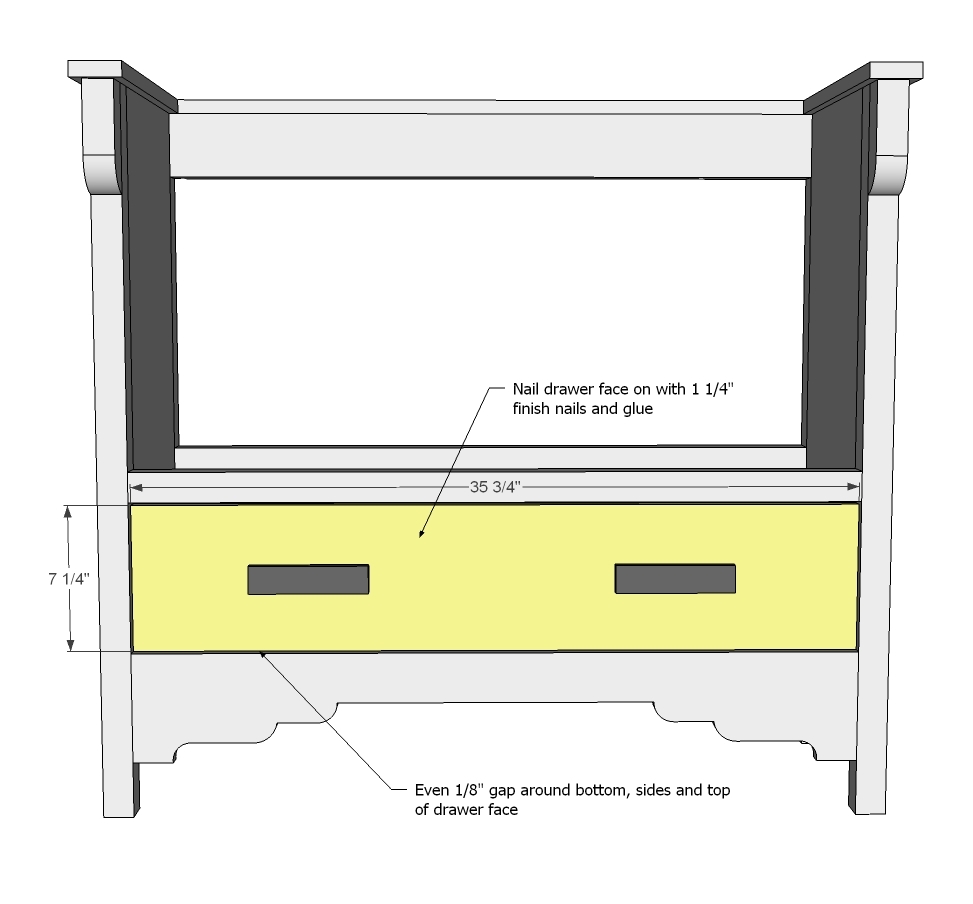
And then the drawer face finishes it all off. Make sure you leave an even gap around the drawer face.
Step 11
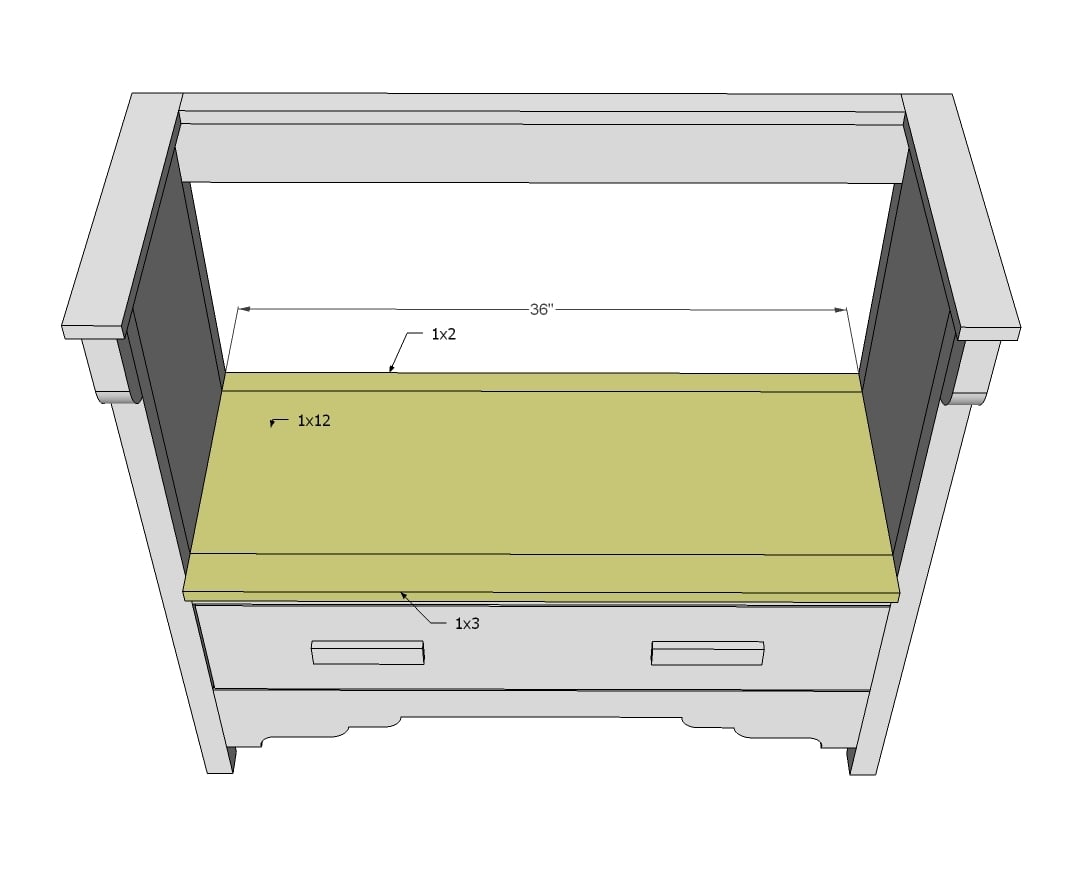
Build seat first with ¾” PHs and 1 ¼” PH screws and attach to bench.
Step 12
And then attach the back.
You can also add quarter round to the inside back as well.
It is always recommended to apply a test coat on a hidden area or scrap piece to ensure color evenness and adhesion. Use primer or wood conditioner as needed.
.jpg)
Comments
debandtom25
Fri, 07/06/2012 - 07:01
So in love
I a beyond loving this plan!!!!! I follow Shanty to Chic and their fabulous ingenuity. What a beautiful job on the bench. I need to find a place for this one. Ana, you are creating an army of builders and many are ready for more complicated plans. Bring it!!!!
soul60s
Mon, 07/16/2012 - 16:13
Love this!
This is perfect for a mud room area or the end of a bed. Can you repurpose an old bureau to make this? Sometimes people just give them away and throwing a bench pad on top would make this perfect for a bedroom. You can sit on it to take off your shoes and store your slippers and such in the drawer. A large enough drawer and you can store your shoes in it or a spare blanket.
Maren (not verified)
Sat, 07/21/2012 - 15:48
I'd love to make this about
I'd love to make this about 60" long. What type of extra support would I need to keep it from sagging under weight?